陽 花嶋 さんの記事「Niagaraでマリオのワンワン作ろう~PDB法でのリアルタイム鎖シミュレーション~」に続いて「UE Advent Calendar 2021」23 日目、そして前回の記事の後編です!
Following Yo Hamashima's article "Let's make Chomp in Mario Bros. ~ real-time chain simulation by PDB method ~," this is the article on the 23rd day of UE Advent Calendar 2021 and the second part of the previous article!
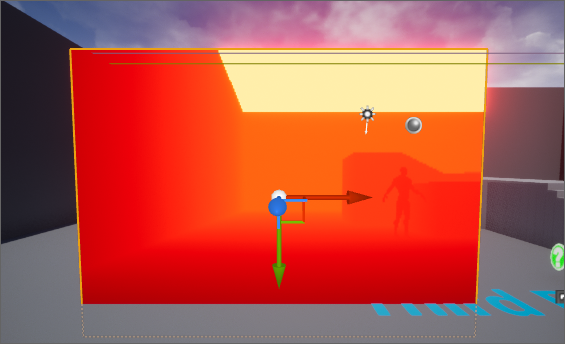
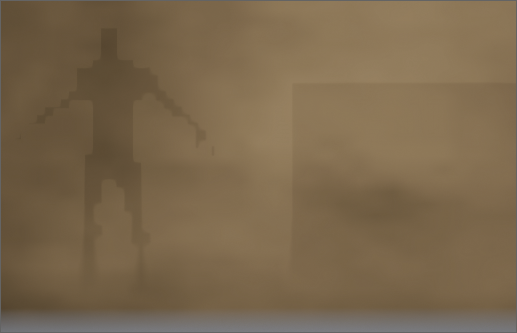
前回、カメラが煙のモデルに近づくと背後のオブジェクトのシルエットが現れるマテリアルを作成しました。しかしシルエットがハッキリし過ぎているのが気になります。
In the first article, I made the material that when the camera approaches the smoke model, the silhouettes of objects appear behind it. However, the silhouettes are too clear.
そこで今回はシルエットをボカすことができないか2つの方法を試してみました。
Therefore, I tried two ways if I can blur the silhouettes this time.
方法1:低解像度の Render Target に深度を描いて利用する | Method 1: Use a Low-Resolution Render Target with the Scene Depth Drawn
まず最初に試したのが、解像度を低く設定したレンダーターゲットに Scene Capture Component を使ってシーンの深度情報を描き込み、それを煙のマテリアルで使用する方法です。
The first thing I tried was to use the Scene Capture Component to draw the depth information of the scene on a low-resolution Render Target, and then use it in the smoke material.
具体的な手順を解説します。
I'll explain the specific procedure.
まずコンテンツブラウザでレンダーターゲットを新規作成します。
First, create a new Render Target asset in the Content Browser.
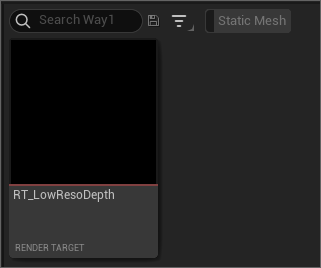
解像度を低く設定し、Render Target Format はここでは RTF R16F を選択、また Auto Generate Mips にチェックを入れて Mipmap を作成しています。
Set the resolution to low and Render Target Format to RTF R16F. And then create Mipmaps by the checkbox for Auto Generate Mips.
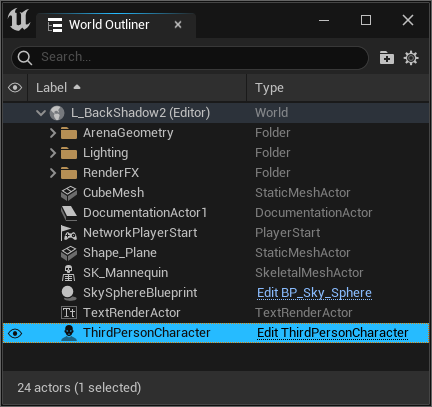
次に、レベルに配置されているサードパーソンキャラクターのBPを開きます。
Second, Open this BP ThirdPersonCharacter placed in the level.
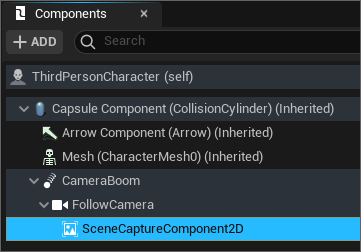
カメラの子として Scene Capture Component 2D を追加します。
Add the component Scene Capture Component 2D as a child of the camera.
SCENE CAPTURE グループ内に先ほど作成したレンダーターゲットを設定して Capture Source を SceneDepth in R に変えます。
In the SCENE CAPTURE group, set the Render Target asset just created and the Capture Source parameter to SceneDepth in R.
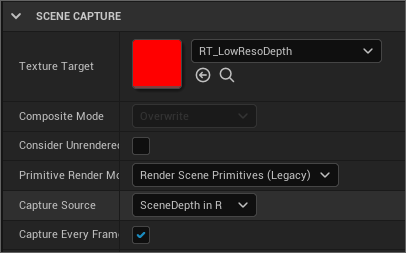
マテリアルを新たに作成してレンダーターゲットをドラッグ&ドロップで放り込み、深度の値が大きすぎるので500で割っています。Blend Mode は Translucent、Shading Model は Unlit にしています。
Create a new material and drop the Render Target asset into it and divide by 500 because the Scene Depth value is too large.

これで、低解像度になった Scene Depth をマテリアルに反映させることができました!
Now, you can make the material apply the low-resolution Scene Depth!
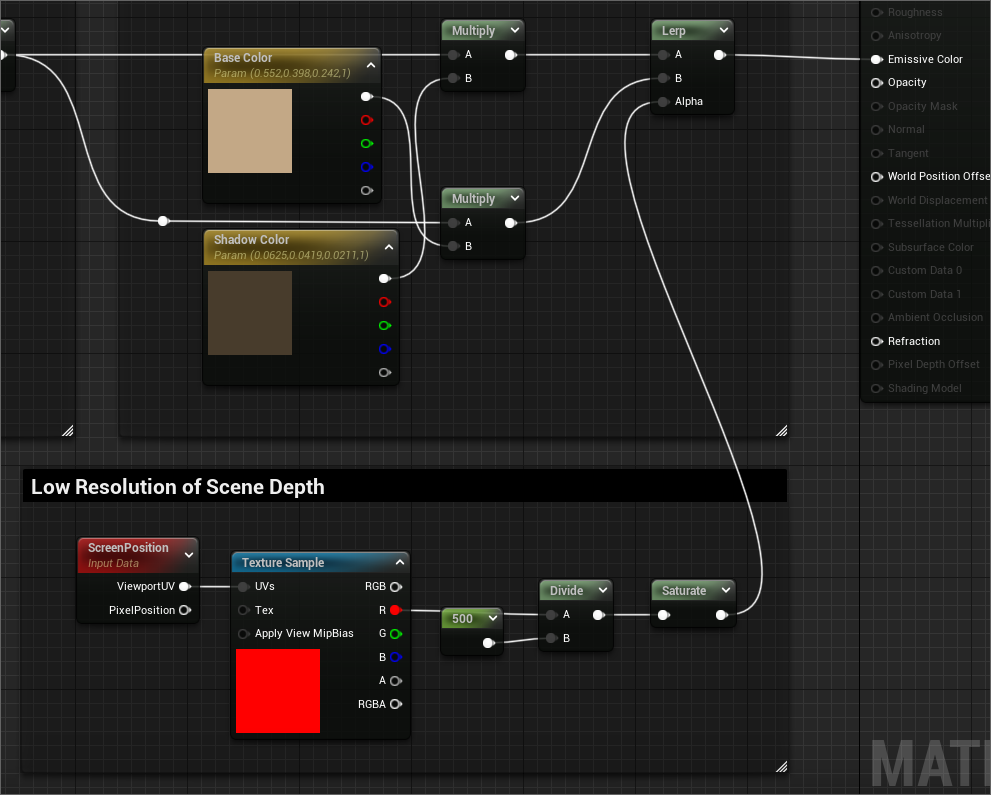
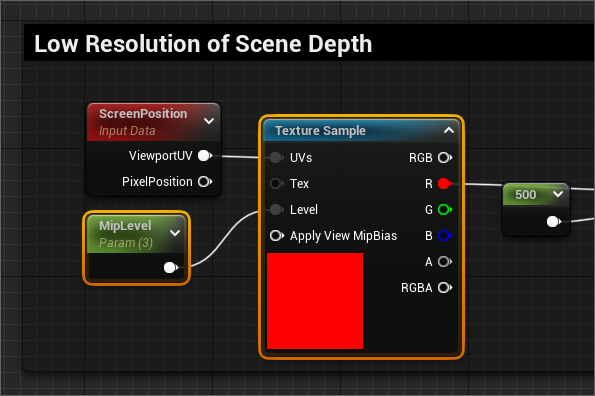
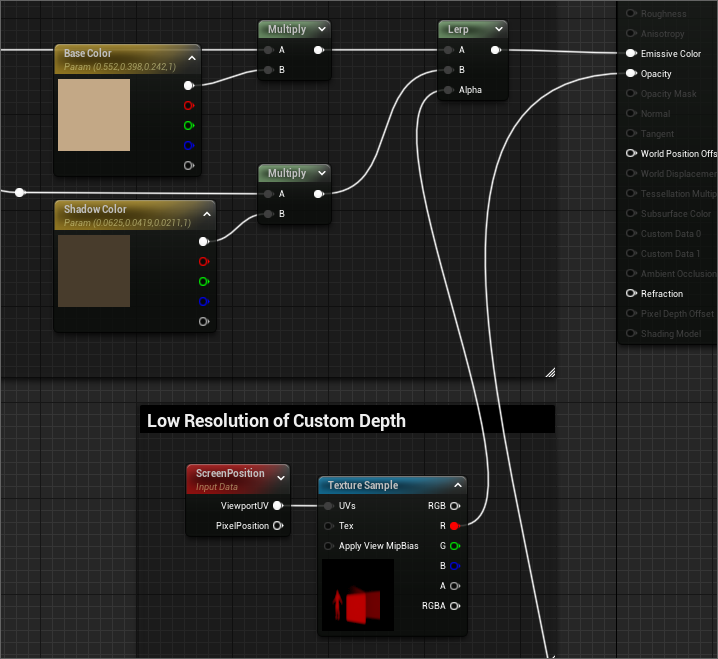
煙のマテリアルに組み込んで確認しましょう。ScenePosition の ViewportUV をレンダーターゲットテクスチャのUVに利用することで、ゲーム中に画面と描画位置を一致させることができます。ただしプレイインディタ(PIE)で確認しないとUVがズレるので注意が必要です。
Use it in the smoke material to check. To use ViewportUV on the ScreenPosition node for the Render Target's UVs, it can be matched to the drawing position on the screen when the game is running. However, be aware that the UVs will shift if you don't check it with the Play In Editor (PIE).
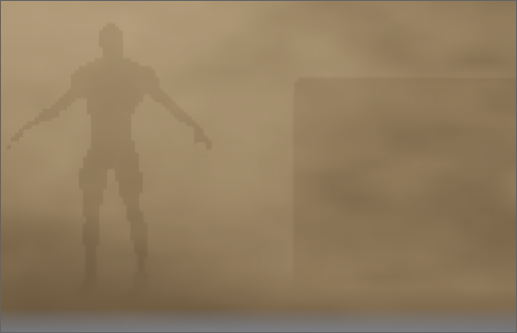
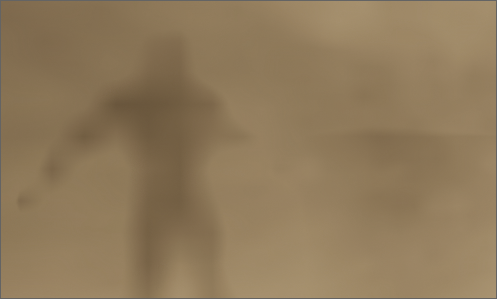
さて‥解像度は粗くなりましたが‥輪郭はシャープです。深度を低解像度のレンダーターゲットに描き込めばフィルタリングで多少でもボケが入るのを期待しましたがダメでした。
Well, the silhouettes look low-resolution, but...the outlines are still sharp. I was hoping that if the Scene Depth information was drawn to the low-resolution Render Target, the filtering would add some blur, but it didn't.
レンダーターゲットの解像度をさらに下げてみましたが、粗さが際立つだけでした。。
I tried to lower the resolution of the Render Target, but The roughness of the silhouettes are only accentuated...
レンダーターゲットで Mipmap を生成する設定にしているので、Texture Sample で Mip Level をパラメータで指定できるようにしてみました。
Since the Render Target was set to generate Mipmaps, I tried to add a parameter to set the Mip Level in the Texture Sample node.
Mip Level を上げても‥粗すぎて使うのは厳しいですね。
Even if I increase the Mip Level, it's too rough and difficult to use.
という訳で最初の方法は失敗に終わりましたが、やりたいことはできたので引き出しが増えたのは嬉しかったです。それから、毎フレームキャプチャするのは重いと思うので注意が必要ですね。
In the end, the first method failed, but it did what I wanted to do and I was happy to have more knowledge. In addition, I think capturing every frame is heavy, so you need to be careful.
実は最初、BP の Draw Material to Render Target でレンダーターゲットを更新する方法を試してうまくいかなかったので Twitter で質問したところ、Niels Dewitteさんに Scene Capture Component を使ってはどうかと教えていただいて実現できました!感謝です!
Actually, when I tried to use firstly the BP Draw Material to Render Target to update the Render Target, it didn't work, so I asked on Twitter, and Niels Dewitte suggested using the Scene Capture Component, then I made it! Thank you very much!

方法2:Custom Depth を DOF でボカして利用する | Method 2: Using Custom Depth Blurred by DOF
毎フレームシーンキャプチャするだけでなく、その上ボカす処理まで加えるのは非現実だと思い、テストを終わろうと思っていたのですが、いつものように com04さんに何か良い方法は無いか泣きついたところ、ポスプロマテリアルで Cunstom Depth を取得して Scene Capture 内のポスプロに設定、DOF でボカした結果を使うのはどうかとアドバイスいただき、うまくいったのでご紹介になります。
I thought it was not good idea that not only capture the scene every frame, but also add the blurring process, so I was about to finish the test. However, as usual, I asked com04 if there was a good way. He adviced me to get Custom Depth in a Post Process Material, set it to the Scene Capture, and use the result of blurring by DOF. Then, it worked, so I'll show you the technique.
少々ややこしいので先に流れを書くと下記のようになります。
It's a little complicated, so I write the procedures for that below first.
1. Scene Capture Component 2D でシーンを描画開始。
1. Start drawing the scene on Scene Capture Component 2D.
↓
2. Scene Capture Component 2D のポスプロでポスプロマテリアルを使って Custom Depth をシーンに描画(DOF をかけるために Before Translucency にする必要がある)。
2. Draw Custom Depth to the scene by a Post Process Material on Scene Capture Component 2D (It needs to set the parameter to Before Translucency to apply DOF).
↓
3. Scene Capture Component 2D のポスプロで DOF を適用。
3. Apply DOF on Scene Capture Component 2D.
↓(ここで半透明オブジェクトが DOF でボケた絵に載らないよう、半透明の描画を省く設定にしておく必要がある)
(It needs to set the setting to omit drawing translucent objects not to draw translucent on the blurred picture by DOF in this timing.)↓
4. Scene Capture Component 2D でレンダーターゲットに描画(DOF でボケた絵を描き込ませたいので Final Color にする必要がある)。
4. Draw the result to the Render Target asset on Scene Capture Component 2D (it needs to set the parameter to Final Color to draw the blurred picture by DOF).
↓
5. 煙のマテリアルでレンダーターゲットを使用
5. Use Render Target in the smoke material.
それでは、順を追って解説します。
Now then, I'll explain them one by one.
こちらもまずはレンダーターゲットを用意して「方法1」と同じように設定します。
First of all, create a new Render Target asset and set it in the same settings as "Method 1".
シルエットの取得には Custom Depth を利用するため、シルエットを出したいオブジェクトに Custom Depth に深度情報を描き込ませる設定を行う必要があります。
In this case, you'll use Custom Depth to get silhouette information, so you need to set the setting to draw the depth information to the objects that you want to show the silhouette.
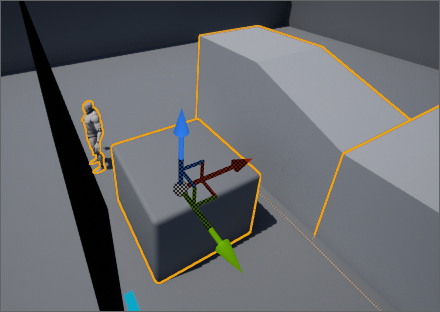
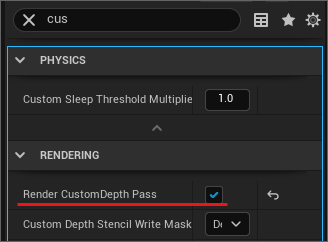
詳細ウインドウで Render CustomDepth Pass を True に設定します。
Set the parameter Render CustomDepth Pass to True on the Detail window.
Custom Depth の利用方法はこちらの動画がとても分かりやすいです。
This video is very easy to understand how to use Custom Depth.
How to Create Masks With the Custom Depth Buffer | Tips & Tricks | Unreal Engine - YouTube
それから、ポスプロ用のマテリアルを新規作成作成して、Material Domain を Post Process に設定します。
And then, Create a new material for Post Processing and set the parameter Material Domain to Post Process.
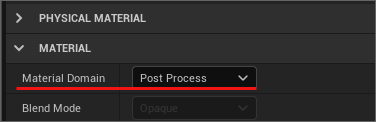
DOFを与えるために Blendable Location を Before Translucency にします。
Also, set the parameter Blendable Location to Before Translucency to apply DOF.

描画の順番はこちらのような感じになるのかと思います。
I think the order of drawing is this.
Before Translucency (Post Process) > Translucency > DOF > Translucency (Render After DOF)
マテリアルは色々な構成の仕方があると思いますが、今回はこちらのように構成しました。DOFが適用された後からだと加工しにくいと感じたのでここで値を小さくして 0 - 1 の範囲で Clamp して反転させています。
There're various ways to construct the material, and in this case, I constructed it as shown picture below. I felt it was hard to modify the silhouette information after applying DOF, so I divided, clamped, and inverted the value of Custom Depth in this material.

次にキャラクターの BP を開き、カメラの子として Scene Capture Component 2D を追加するのは「方法1」と同じです。
Next, open the player character's BP and add Scene Capture Component 2D as a child of the camera as method 1.
SCENE CAPTURE グループ内に先ほど作成したレンダーターゲットを設定します。Capture Source は「Final Color」と名の付くものを選べばOKです。
In the SCENE CAPTURE group, set the Render Target just created, and in the Capture Source parameter, choose the one with the name "Final Color" at the beginning.

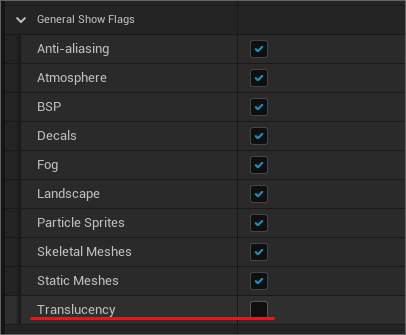
少し下にスクロールして General Show Flags で Translucency のチェックを外します。本来なら Custom Depth 取得に必要な要素以外は全て外した方が良い感じでしょうか。
Scroll down a little, and uncheck the Translucency check box in the General Show Flags group. It would be better to uncheck everything except for the elements required to get Custom Depth.
POST PROCESS VOLUME グループ内の Depth of Field > Focal Distance 等を触って好みのボケ具合を設定します。
In the POST PROCESS VOLUME group, change the Focal Distance parameter of Depth of Field to adjust the amount of blurring as you like.

また Rendering Features > Post Process Materials で先ほど作成したマテリアルを設定します。
And then, in the Rendering Features group, set the post-process material just created.

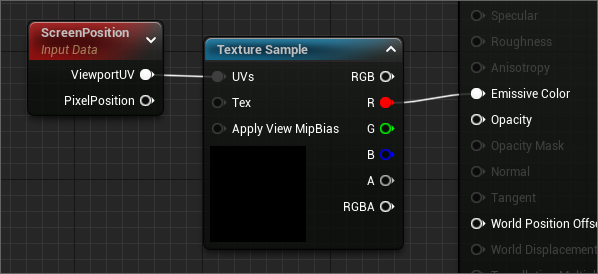
これでボケたシルエットを取得する準備が整ったので、まずは情報が正常に取得できるか確認してみます。新規マテリアルを作成して Blend Mode を Translucent に設定し、レンダーターゲットを放り込みます。また、画面と一致するよう ScreenPosition をUVに繋ぎます。
Now, you're ready to get the blurry silhouette, so you should check it if you can get the information correctly. Create a new material, set the Blend Mode parameter to Translucent, and drop the Render Target texture to the material. Also, create the ScreenPosition node and connect it to the texture's UV to match the position in the playing window.
PIE でゲームを実行し、うまくいっていることが確認できました!
If you run the game in PIE, you'll see that it work!
あとは前半の記事でご紹介したような煙の構成でレンダーターゲットを利用すれば完成です。
At last, use the Render Target in the smoke material like the construction in the prebious article, so it's complete.
うまくいきました!
It works!
実はこれではまだ不完全で‥煙モデルの手前に Custom Depth を描くモデルが存在するとシルエットに含まれてしまいますが、今回の検証はここまでにしたいと思います。
Actually, this is still incomplete because...if there're models with settings for drawing Custom Depth in front of the smoke model exist, it will be included in the silhouettes. However, this is all for this verification.
Scene Capture Component で半透明のレンダリングを除外することができるのも初めて知ったので、色々と勉強になりました。
I didn't know that using the Scene Capture Component can omit the rendering translucency, and I learned a lot.
ちなみに Custom Depth の利用時の負荷は Epic Games Japan 篠山さんのこちらのスライドの p.129 に記載されていますが、利用するオブジェクトが多いとかなりの負荷になるようなので注意が必要ですね。。
By the way, page 129 in this slides made by Noriaki Shinoyama of Epic Games Japan show you the GPC-intensive while using Custom Depth, and it seems very high when using many objects drawing Custom Depth in a scene.
今回は以上になります。例によって間違っていたり「もっと良い方法があるよ!」という場合はコッソリ教えてください~!
That's all this time. As usual, if I'm wrong or there is a better way, please let me know!
明日は @marv_kurushimay さんによる WaterPlugin の記事になります!エフェクトアーティストは必見ですね!
Tomorrow the new article about WaterPlugin by @marv_kurushimay will be published! I believe it's required for any VFX artist!