煙に背後のオブジェクトのシルエットを写す [前編] | Draw silhouettes of objects behind smoke Part.1
ほげたつさんのブルーマンチャレンジ!の記事 に続いて「UE Advent Calendar 2021」7日目の記事になります!
Following Hogetatu's article (about Blueman Challenge!), this is the article on the 7th day of UE Advent Calendar 2021!
去年は何を書こうかと思っていたら12月が終わってしまいましたが、今年は2019年の記事と同じようにマテリアルを使った表現について取り上げたいと思います。
Last year, December ended before I came up with what to write about, and this year, I want to show an expression using materials on UE like my article in 2019.
今回のテーマ | Theme of This Time
さて、CEDEC2017は「ゼルダの伝説 ブレスオブザワイルド」の講演が8つもあり、そのどれもが大変興味深く、日本の開発者が大いに沸いた年でもありました。
Now, CEDEC2017 had eight talks on The Legend of Zelda: Breath of the Wild, all of which were very interesting and got Japanese game developers very excited.
そしてその内の1つがエフェクトに関する講演でした。
Then, one of them was a talk on VFX.
『ゼルダの伝説 ブレス オブ ザ ワイルド』 ~エフェクトは「目指す表現」と「膨大な物量」にどう取り組んだか
その非常に面白いアイデアの数々に私も刺激を受けまくりました。
I was really stimulated by the many very interesting ideas.
その講演内容について直接取り上げることはできませんが、語られていたテクニックの1つの再現を UE5 Early Access で試みてみました。それがこちらです!
I can't go into the details of the talk, but I tried to recreate one of those techniques on UE5 Early Access. This is it!
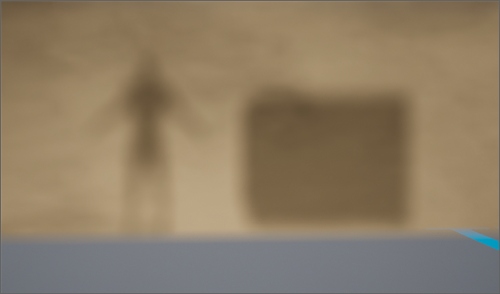
不透明に近いくらい濃い煙に、背後のオブジェクトのシルエットを影のように表示しています。マテリアルだけで行える上に、構成も非常にシンプルです。
Silhouettes of the objects behind are displayed like a shadow in near-opaque smoke. It's a very simple way and can be expressed using only one material.
マテリアルの構成 | Nodes of the Material
まずは最終的なマテリアルの全体図です。一見多く見えるかも知れませんが‥
This is the whole view of the material. At first glance, it may look like a lot of nodes...
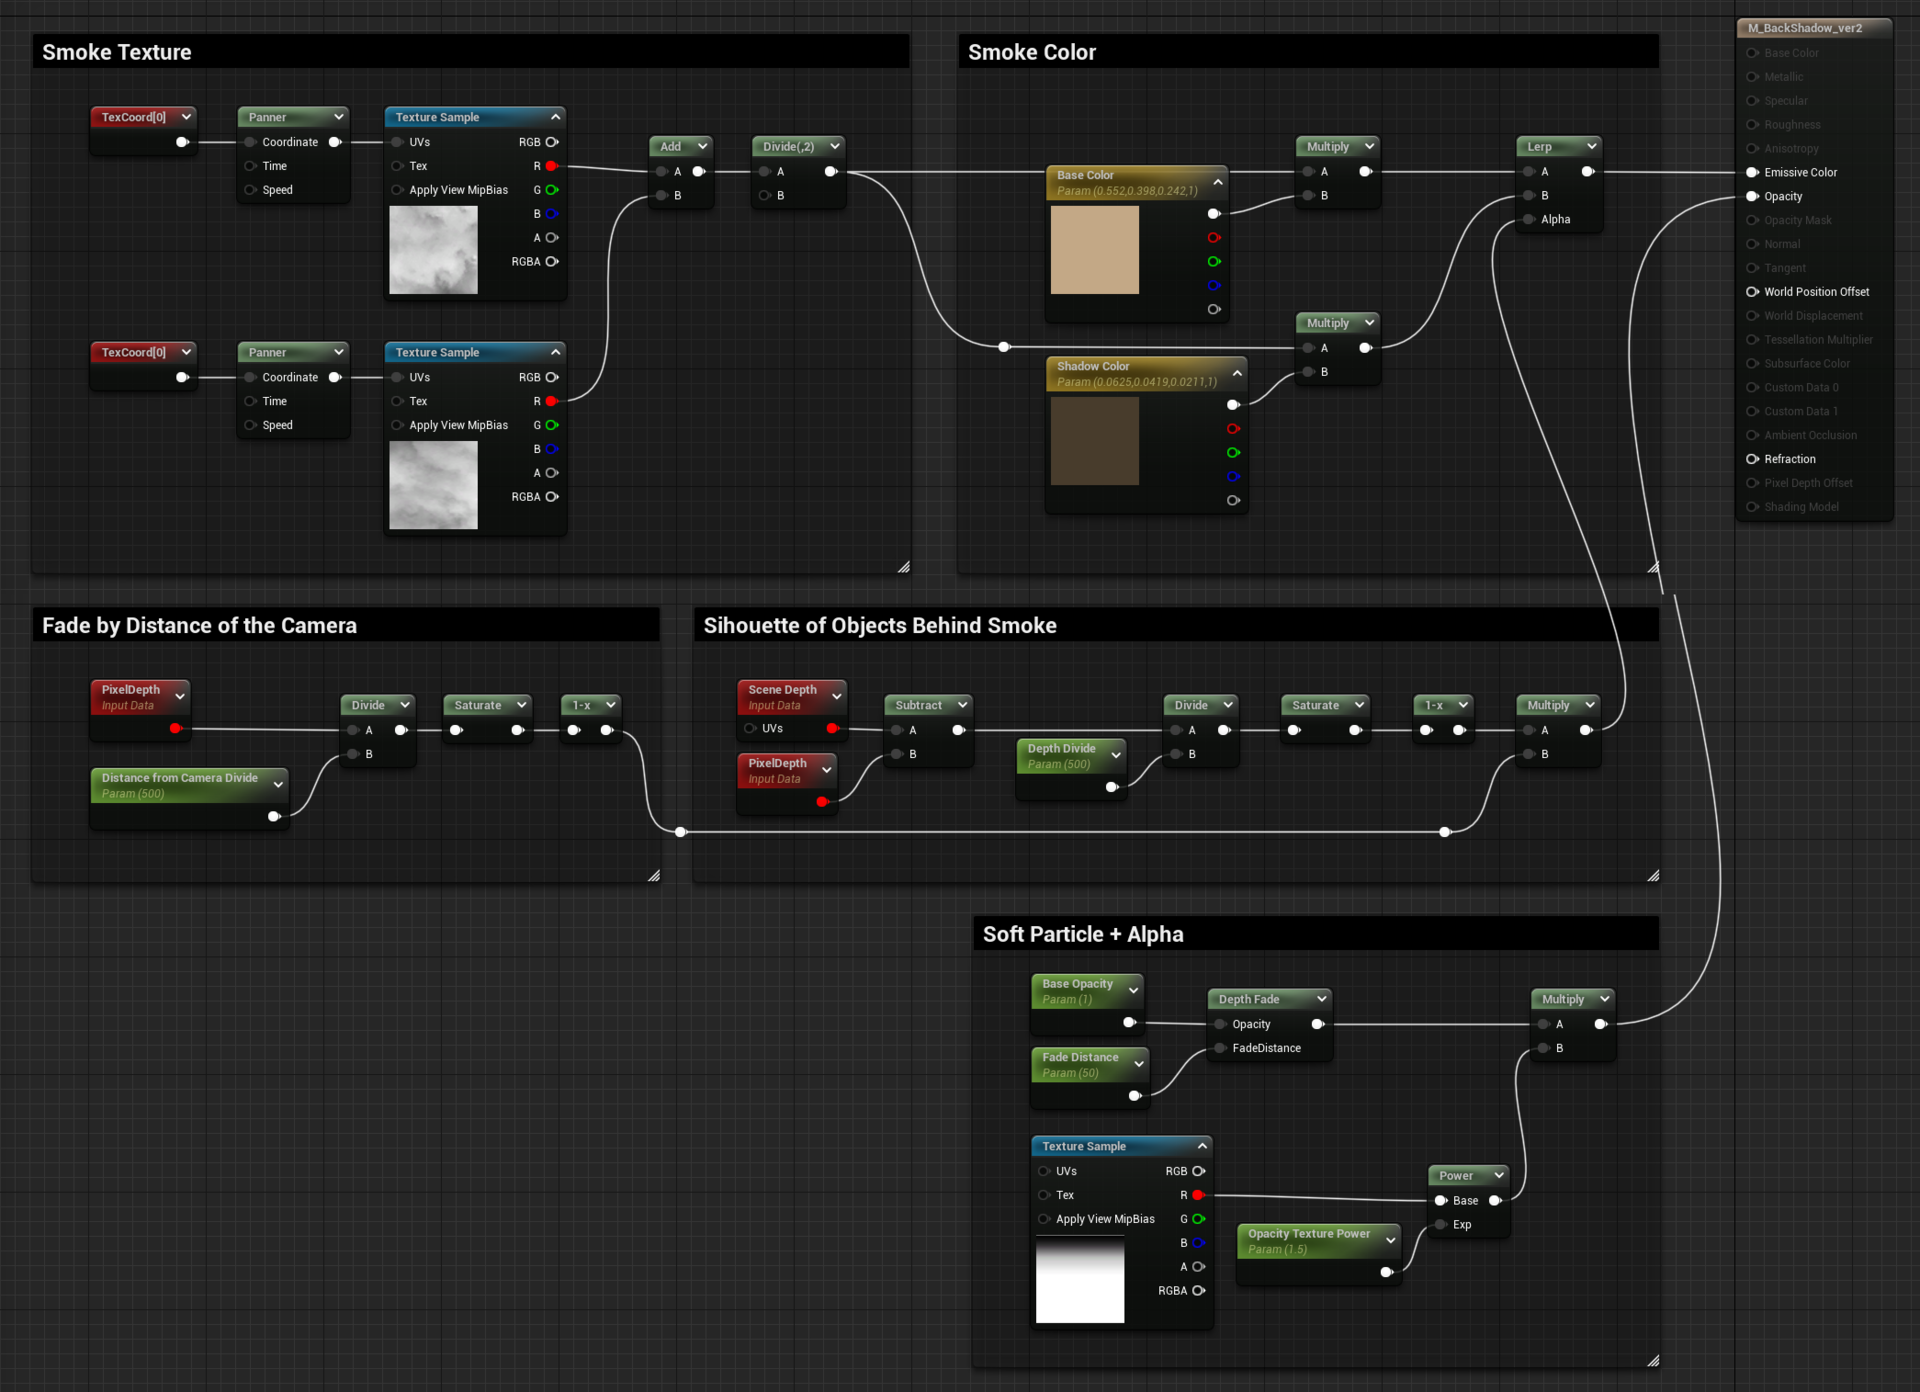
今回の表現の肝となるのはこちらだけです。
These are the only nodes that are the key to the expression this time.
それでは、1つずつ順を追って説明していきます。
Now, let me explain them one by one.
シーン深度を利用する | Using Scene Depth
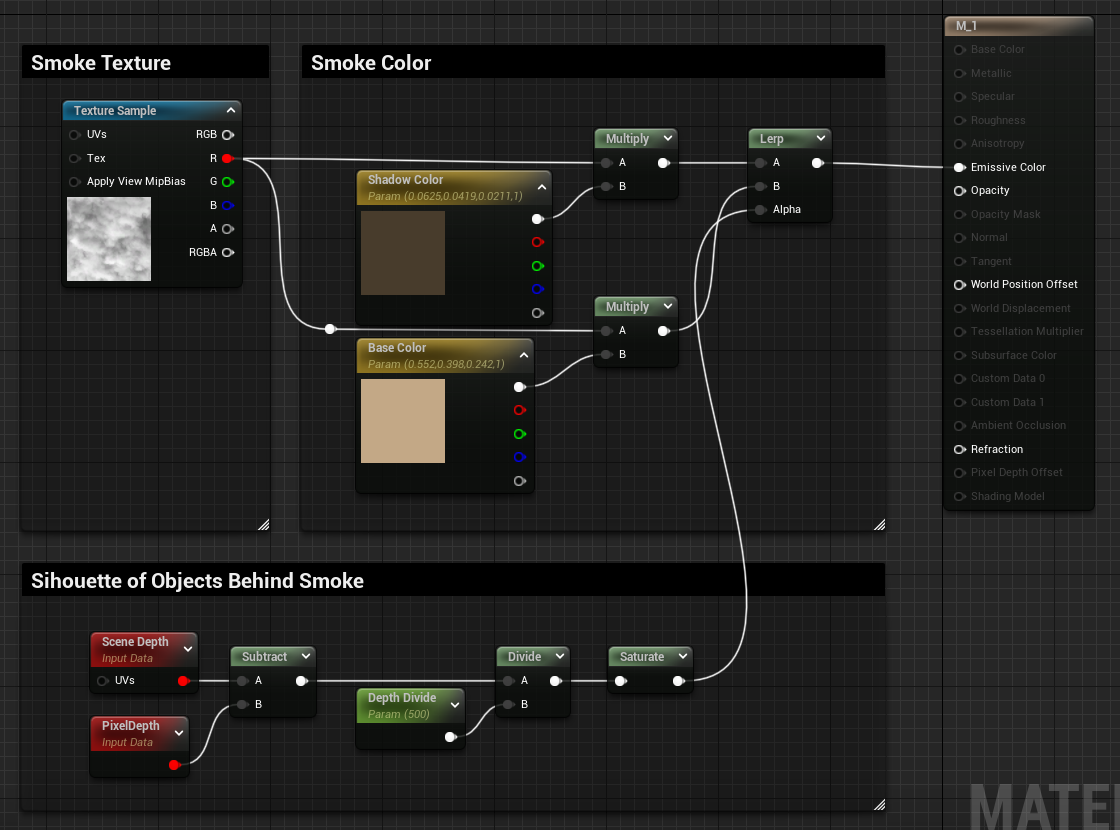
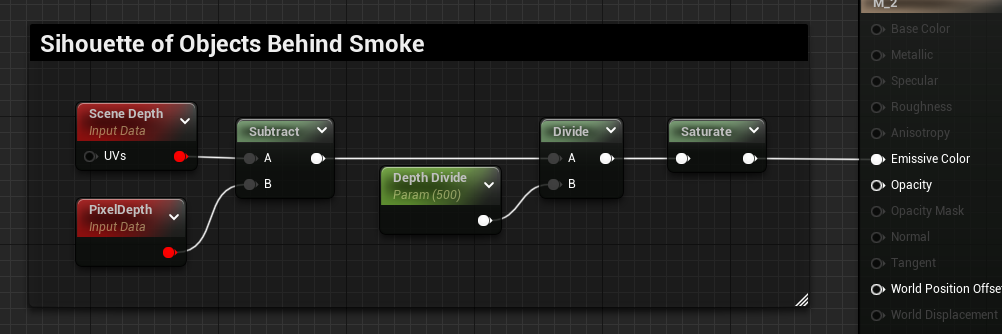
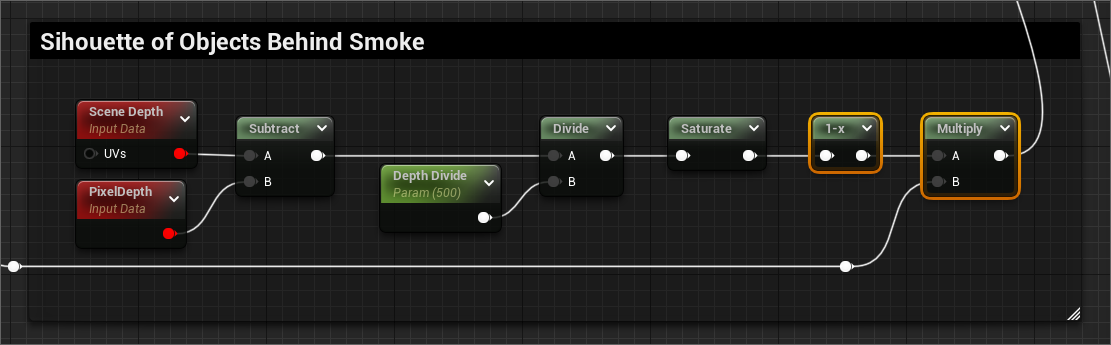
一番重要な構成はこちらです。煙の背後のオブジェクトのシルエットを表現するために Scene Depth を使ってシーンの深度情報を利用しています(特定のモデルのシルエットだけ欲しいなら Custom Depth を利用しても良いと思います)。
The most important nodes are these. To express the silhouette of objects, I use the depth information of the scene using the Scene Depth node. If you only want the silhouette of specific models, you can use the feature Custom Depth.
なぜ Pixel Depth を引いているかはこの後に解説します。
I'll explain the reason why I subtract the Pixel Depth node later.
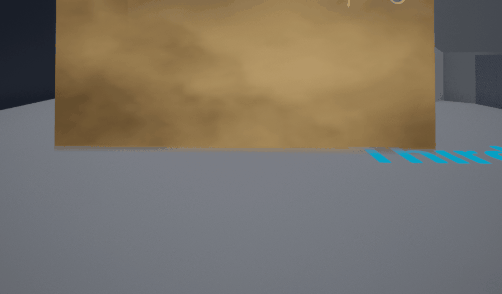
レベルに板モデルを置いてマテリアルを適用するとこんな感じになります。
This is the result of placing a plate model in the default level and applying the material.

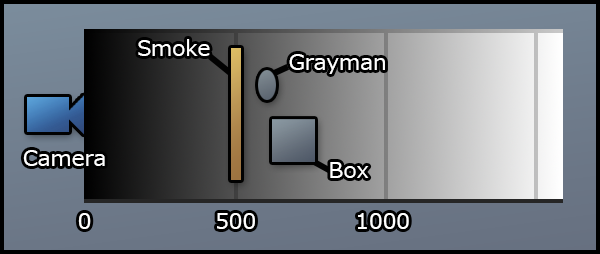
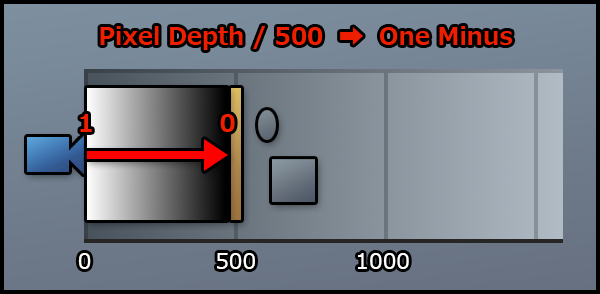
このシーンは、上から見下ろすとこちらの図のイメージです。
Looking down on this scene from above, it looks like this picture below.
図はカメラから 500 離れた距離に半透明の煙マテリアルを貼り付けた板モデルを配置し、その背後にグレイマンと箱のオブジェクトを配置している様子です。
A plate model applying the translucent smoke material is placed at a distance of 500 meters from the camera, and a Mannequin (called Grayman in Japan) and a box model are placed behind it.
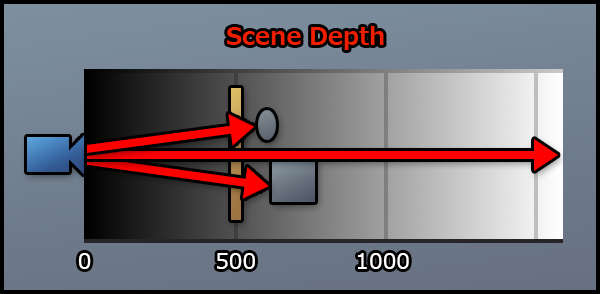
Pixel Depth はカメラから煙モデルのピクセルまでの距離になります。
Pixel Depth is a distance from the camera to the pixel of the smoke model.

Scene Depth はカメラからシーン内の不透明オブジェクトまでの距離になります。
Scene Depth is a distance from the camera to pixel of the opaque objects in the scene.
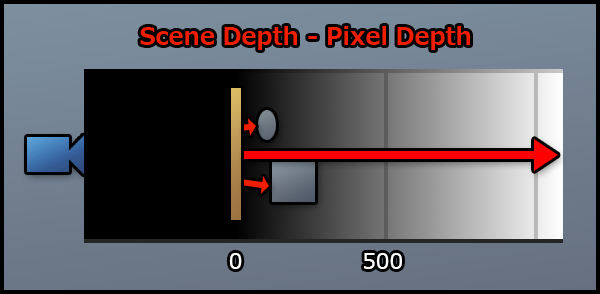
煙マテリアルで使いたいのは、煙マテリアルを適用した板モデルから奥の深度情報だけです。そこで、Scene Depth から Pixel Depth を差し引けばOKです。
The only thing I want to use is the depth information at the back from the smoke model, then you only need to subtract Pixel Depth from Scene Depth.
それからアンリアル単位は cm なので、得られる深度の値が大きすぎます。そこで深度の値を例えば 500 で割ると 500(5m)で 1 が得られる数値に補正できます。
In addition, since Unreal units are in centimeters, the value of depth you get is too large. Then you can adjust the value by division to a number that becomes 1 at 500 (5 meters).
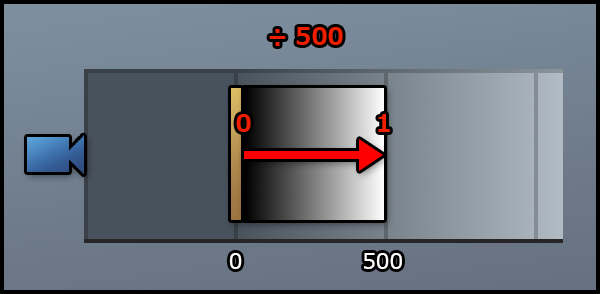
最後に 0 ~ 1 でクランプするために Saturate を繋いでいます。Clamp ノードでも良いのですが、Saturate の方が設定が楽なのと省スペースなので好んで使っています。
After dividing the value, finally, use the Saturate node to clamp from 0 to 1. I prefer the Saturate node to the Clamp node set from 0 to 1 because it's space-saving and useful.

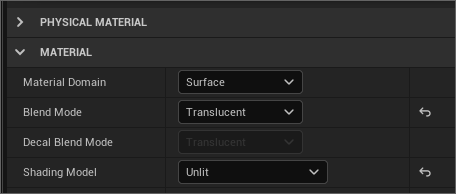
ちなみに、Scene Depth はシーン全体の不透明オブジェクトの深度情報になるので、マテリアルで利用する場合はその後に描画される半透明になっている必要があります。
By the way, Scene Depth is the depth information of the opaque objects in the scene, so if you want to use the value in your material, it must be translucent which is rendered after the depth information is rendered.
なのでマテリアルの Blend Mode を Translucent にしています。
今回、煙はライティングはしないので Shading Model は Unlit にしています。
Therefore, you have to set its Blend Mode parameter to Translucent. And then, if you don't need to light the smoke, you can set its Shading Model parameter to Unlit.
煙の色分け | Color-coding of Smoke
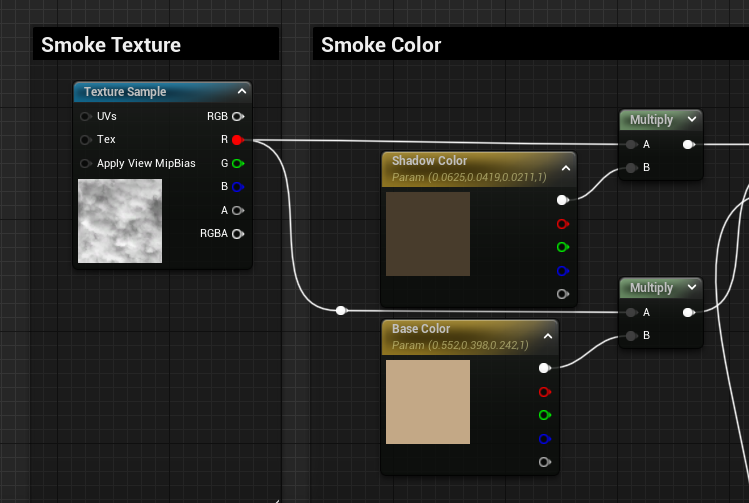
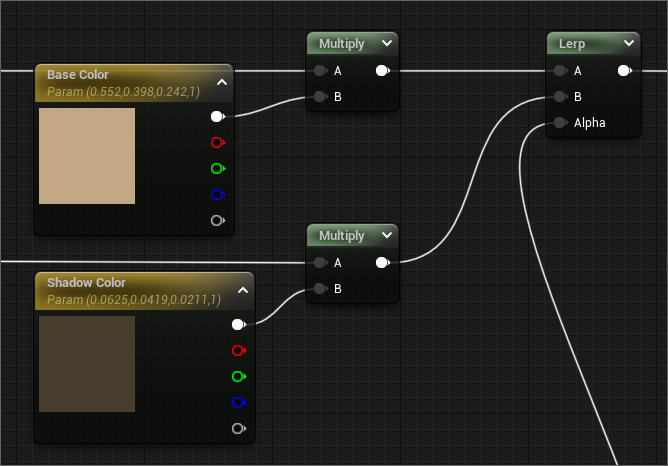
モデルの背後の深度情報を0~1の値で取得できたので、その値を Lerp ノードに繋いで煙の基本色と影色でカラーリングします。
Now, you've gotten the depth value in the range 0 to 1 behind the smoke model, so you can use the value and the Lerp node to draw the base and shadow color of the smoke.

このような結果になりました。
This is the result.

ここからは盛り付け部分の説明に入ります。
From now, I'll explain the additional elements.
煙のテクスチャを適用 | Aplying a Smoke Texture
適当な煙のテクスチャを2つの色に乗算で掛け合わせます。
ここではスターターコンテンツ内のテクスチャを使用しています。
To mix these two colors by multiplication, you'll prepare a smoke texture.
And then, in this picture below, I'm using the texture in the Starter Content.
<Texture2D'/Game/StarterContent/Textures/T_Smoke_Tiled_D.T_Smoke_Tiled_D'>
煙が動かないと味気ないのでUVスクロールさせますが、少し複雑な動きに見えるよう同じテクスチャを2つ重ねて多重スクロールさせました。2つのテクスチャを足して2で割ることで値を平均化して色を 0 ~ 1 の輝度に収めています。
If the smoke doesn't move, it doesn't look like smoke. So to make the smoke look a little more complex, you can use two same textures to make multiple scrolling. By adding the two textures and dividing by two, the values are averaged and the color value is contained in a range of 0 to 1.
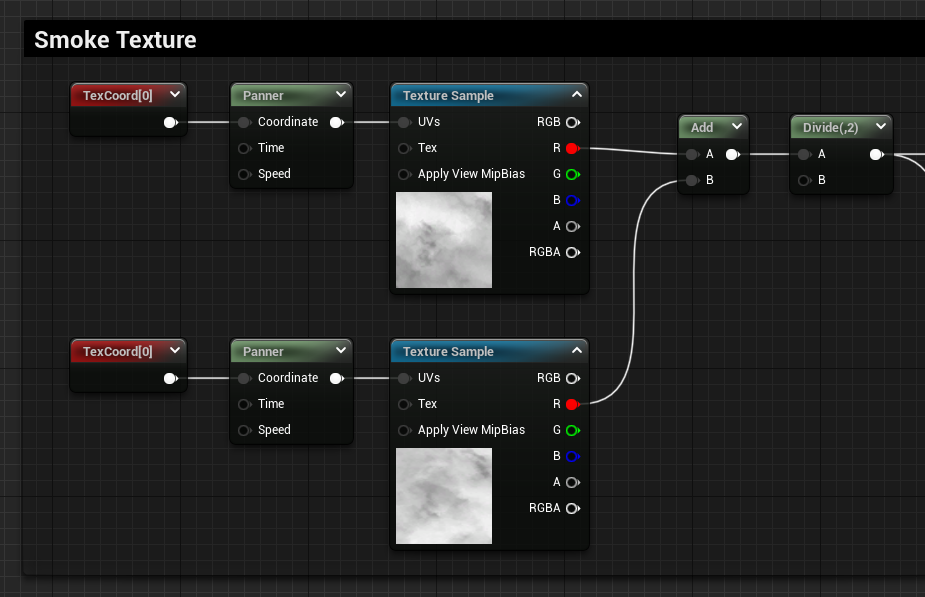
上段のUVの設定 | Upper UVs Settings
U Tiling = 0.3 / V Tiling = 0.3 / Speed X = -0.07 / Speed Y = 0.03下段のUVの設定 | Lower UVs Settings
U Tiling = 0.213 / V Tiling = 0.317 / Speed X = -0.093 / Speed Y = 0.041
これで煙に多少の奥行きが付きました!
Now, The smoke has more depth!
もう少し盛り付けてみましょう。
Let's add a few more elements.
透明部分の設定 | Settings of Translucent
煙モデルに、多少エフェクトらしい透過処理を加えます。
Add some transparency elements to the smoke model to become more effect-like.
Depth Fade はお馴染み「ソフトパーティクル(背後の不透明オブジェクトが近いと透過させる)」を与えるためのノードで、これにより地面への突き刺さりを緩和させています。
The Depth Fade node gives an effect so-called Soft Particle that makes its pixel transparent when the close opaque object behind itself. By the effect, it can cover up the smoke model sticking into the ground.
またマスクするためのテクスチャ(ここでは単なるグラデーションテクスチャですが)を用意して煙にフェードを加えています。
And then, To add fading to the smoke, prepare a mask texture (it's just a gradient texture though).
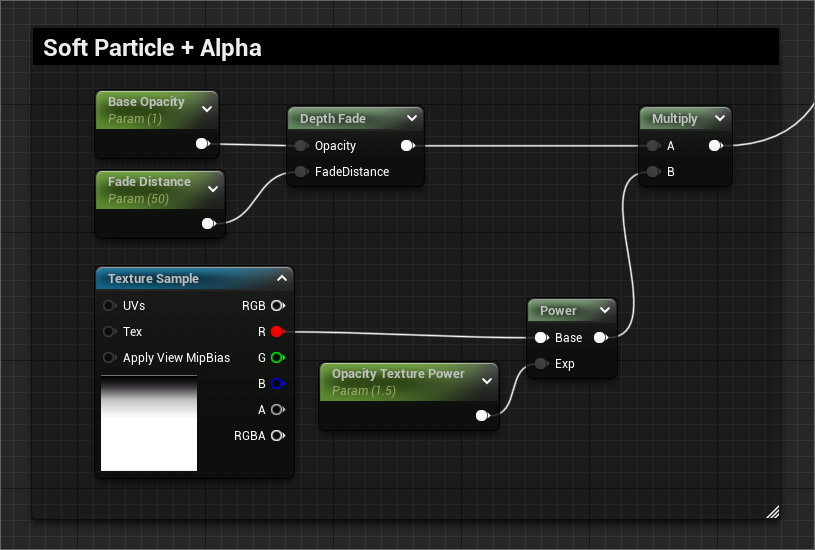
以上の構成を Opacity に繋ぐとこちらの通り。
If these nodes connect to the Opacity port, the result is as you can see.
カメラの距離でシルエットを見えなくする | Make the Silhouettes Disappear by the Distance of the Camera
煙が遠くにある場合にはシルエットを見えなくした方が良いと思ったので、入れてみます。いわゆるカメラとの距離でフェードさせる構成を利用します。
I thought that making the silhouettes disappear is better when the distance between the smoke model and the camera is far, so add the other effect so-called Camera Fade.
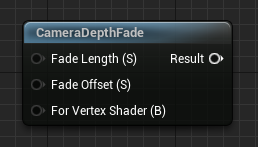
UE標準で CameraDepthFade というノードがあるのでこちらを使っても良いのですが、2つの機能が内包されていて説明がややこしくなるので今回は使いません。
You can use this material function CameraDepthFade on UE, but it contains two functions and complicates the explanation, so I don't use it this time.
代わりにこちらのように構成してみてください。
Instead, you can make the structure as shown below.
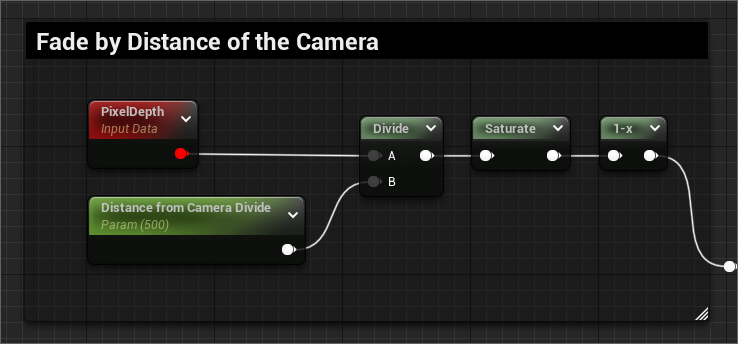
何をしているかはこちらの図を見ると理解しやすいと思います。
To see the picture below, you may be easy to understand what is happen.
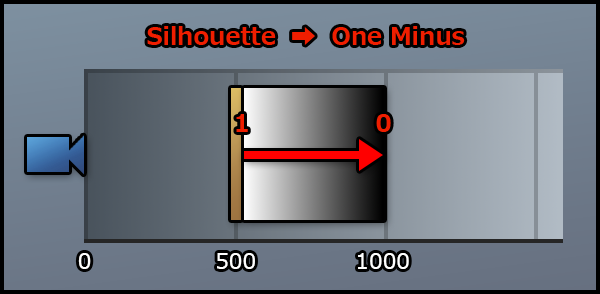
Pixel Depth で煙モデルまでの距離を取得し、500(5m)の範囲で 0 ~ 1 の値になるように割ってから One Minus で値を反転させています。その結果をシルエット情報に乗算することで、0 になる距離でシルエットを無効化させるためです。
Using Pixel Depth can get the distance value from the camera to the smoke model, and divide by 500 to become the range 0 to 1, and then, One Minus inverts the value to disappear the silhouettes by multiplying at the distance of 0.
実際にシルエット情報を取得する部分に乗算していますが、シルエット情報も 0 だとシルエットが出ないようにするために 0 ~ 1 を One Minus で逆転させています。
The value multiplies the silhouettes information and also uses the One Minus node to invert the value, so the silhouette can be disappeared by multiplying at the distance of 0.
シルエット情報を One Minus するとこちらの図のようになります。
The picture below explains the result of using One Minus to the silhouettes information.
Lerp の Alpha が 0 の時は基本色が適用されるように、入力 A と B を繋ぎ替えます。
You have to swap the connections between A and B in the Lerp node to apply the base color when the Alpha value is 0.
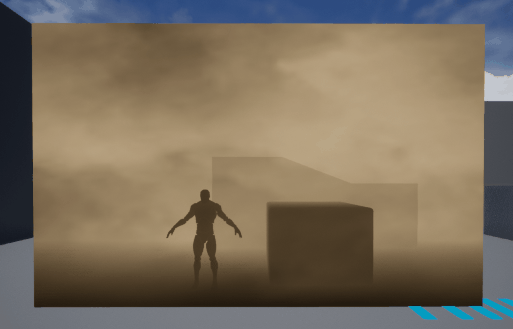
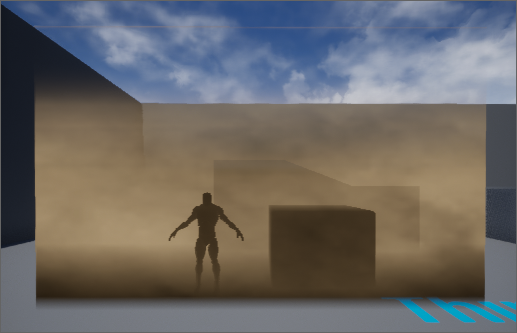
これでやりたかった事が一通り入り、完成しました!
It's finished, and this picture below is the result of applying the things I wanted to do!
しかし‥ | However...
シルエットがハッキリし過ぎているので、ボカしたくなりますよね?
The silhouettes are too clear, so you want to blur it, don't you?
そこでシルエットをボカすことができないか試してみました。その結果は 12/23 の Advent Calendar の記事でお見せする予定です!
Then, I tried to blur the silhouettes, and I'll show you the result in my new article on UE Advent Calendar on December 23!
今回は以上になります。例によって間違っていたり「もっと良い方法があるよ!」という場合はコッソリ教えてください~!
That's all this time. As usual, if I'm wrong or there is a better way, please let me know!
明日は @prince_ue4 さんによる記事『UE4で「戦場の絆」のような操作を実現してみる』になります!記事中のコントローラで遊んだら楽しそうですね!
Tomorrow the new article "Trying to realize 'Mobile Suit Gundam SENJO NO KIZUNA'-like controls on UE4" by @prince_ue4 will be published! That sounds fun playing with the controller in this article!